
Arch Pro is a precision-tuned LOG to REC709 LUT system built specifically for the Pocket Cinema Camera 4K, 6K, and 6K Pro. The base set includes a Natural LUT along with Filmic and Vibrant character LUTs—each one uniquely matched to your camera’s sensor and LOG profile. This isn’t one-size-fits-all, it’s one-for-each, engineered for color that just works.
Want more? The Plus and Premium Bundles unlock stylized Film Looks and DaVinci Wide Gamut support for Resolve users.


Whether you’re a filmmaker, YouTuber, or weekend warrior, if you're working with Pocket 4K, 6K, or 6K Pro footage, this is the fastest way to make it shine. Arch Pro enhances highlight rolloff, improves skin tone, and just looks good.
Import Arch Pro LUTs right into your Pocket Cinema Camera to preview the colors live — great for livestreams, fast turnarounds, or video village. Burn it in if you want. Shoot LOG and tweak later if you don’t.

Create a cohesive cinematic look without obsessing over complex node trees. Whether you’re cutting a music video or a doc on a deadline, these LUTs hold their own — and still play nice with secondary grading and effects.

Arch Pro Plus adds 12 pre-built Film Looks that range from elegant monochromes to punchy stylization. Everything from a Black & White so classy it’d make Fred Astaire jump for joy to a Teal & Orange that could coax a single tear down Michael Bay’s cheek.


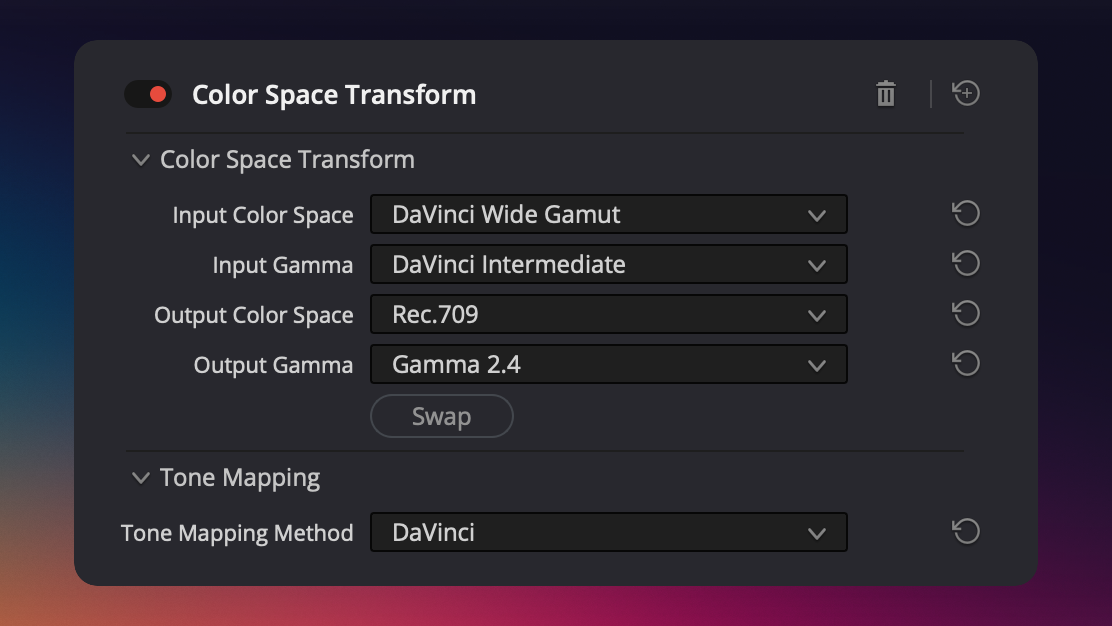
Arch Pro Premium unlocks a secret weapon: DaVinci Wide Gamut support. No Rec709 bakes. No locked-in looks. Just a clean, accurate conversion into DaVinci’s modern color space — built for real post workflows and future-proof grades.

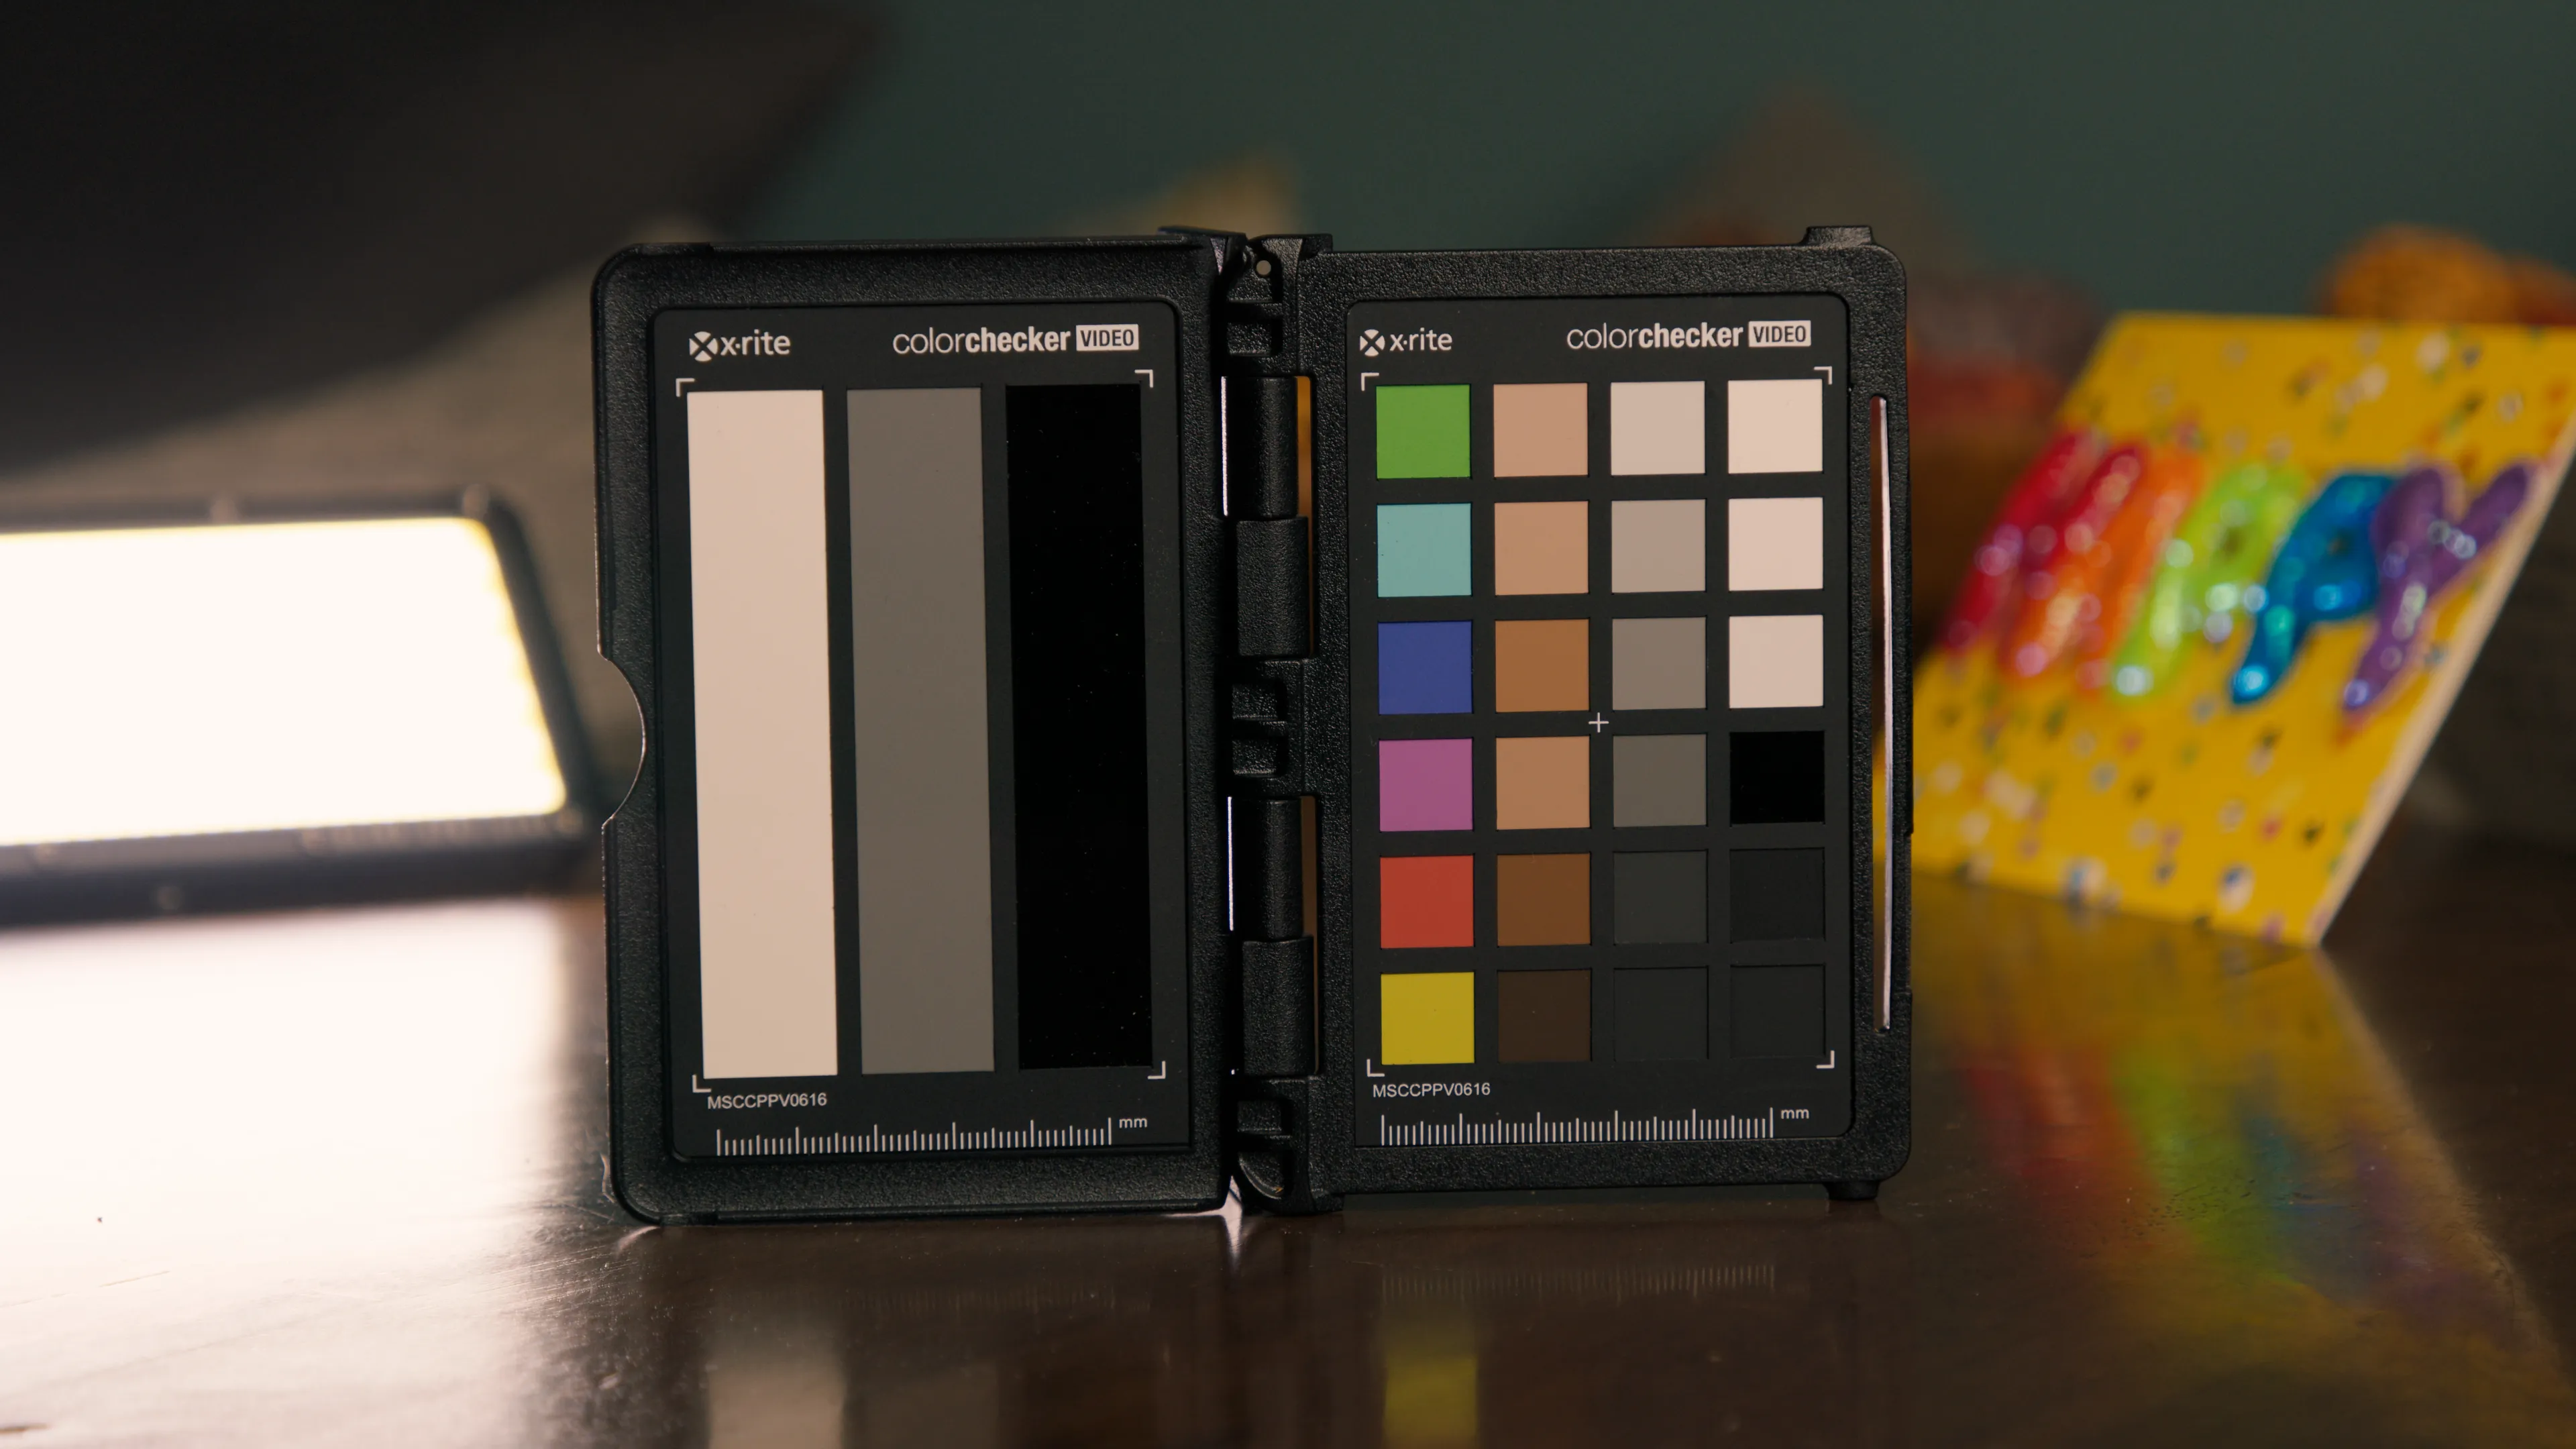
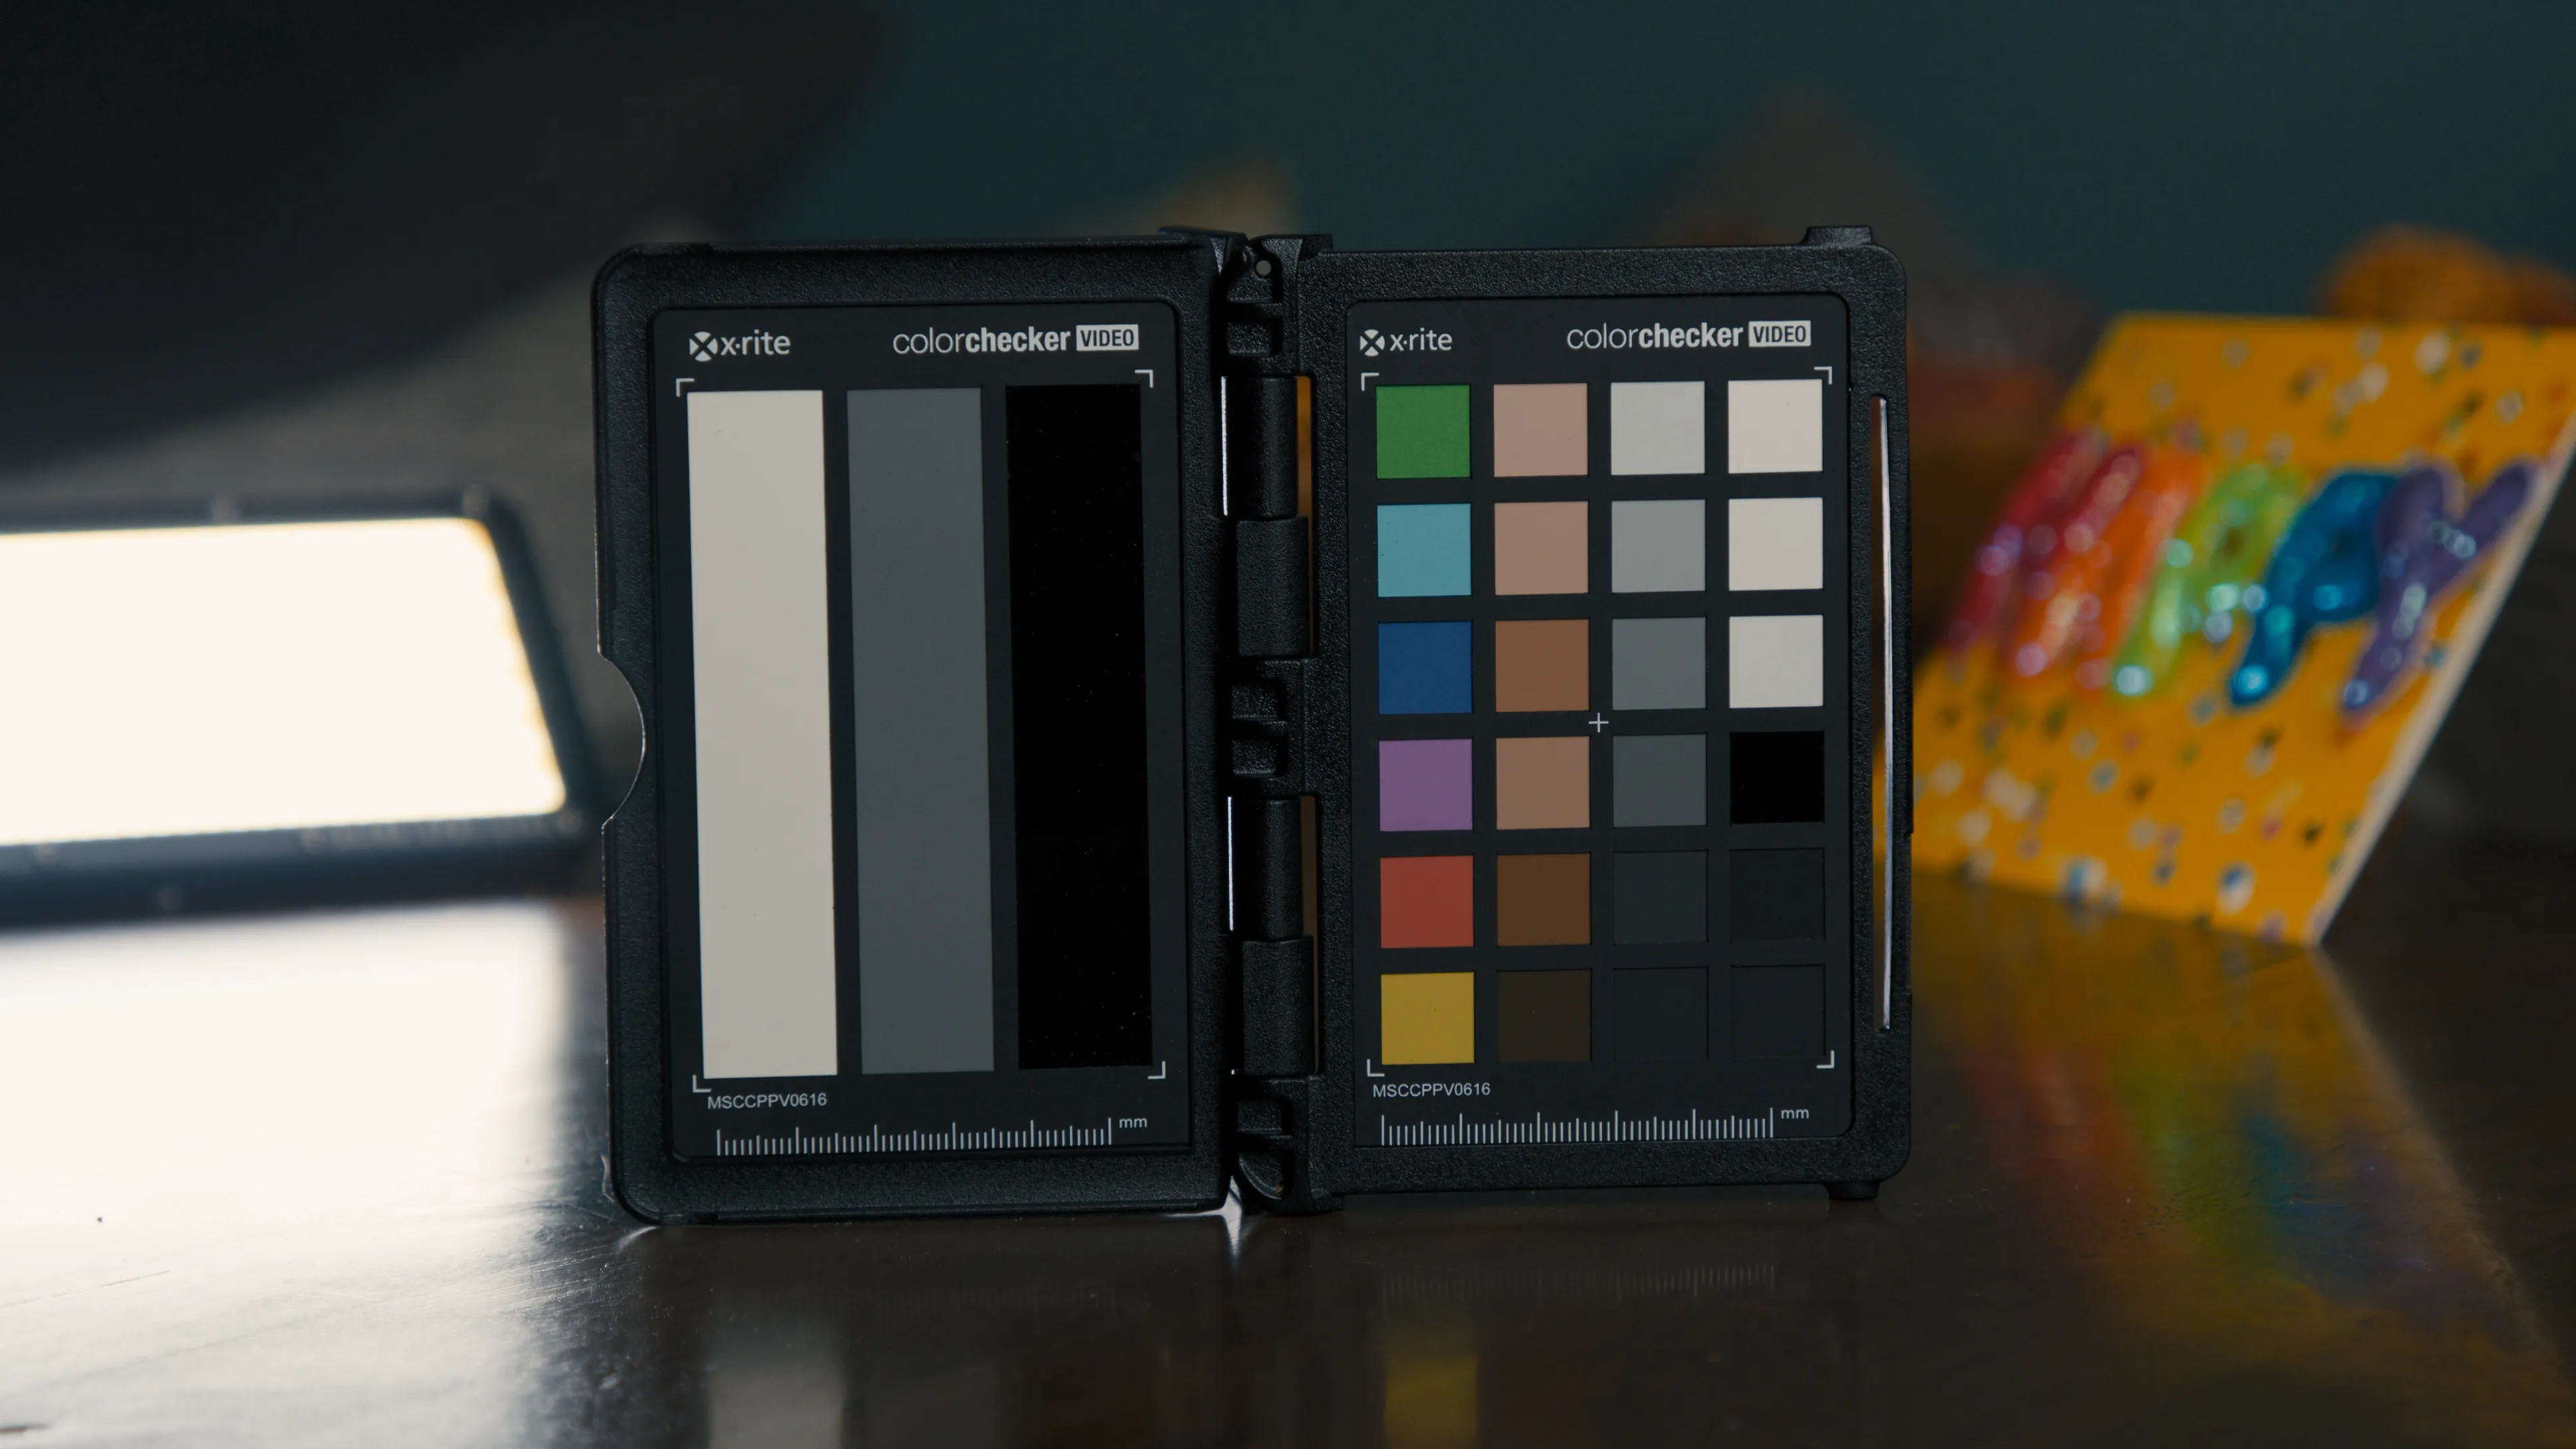
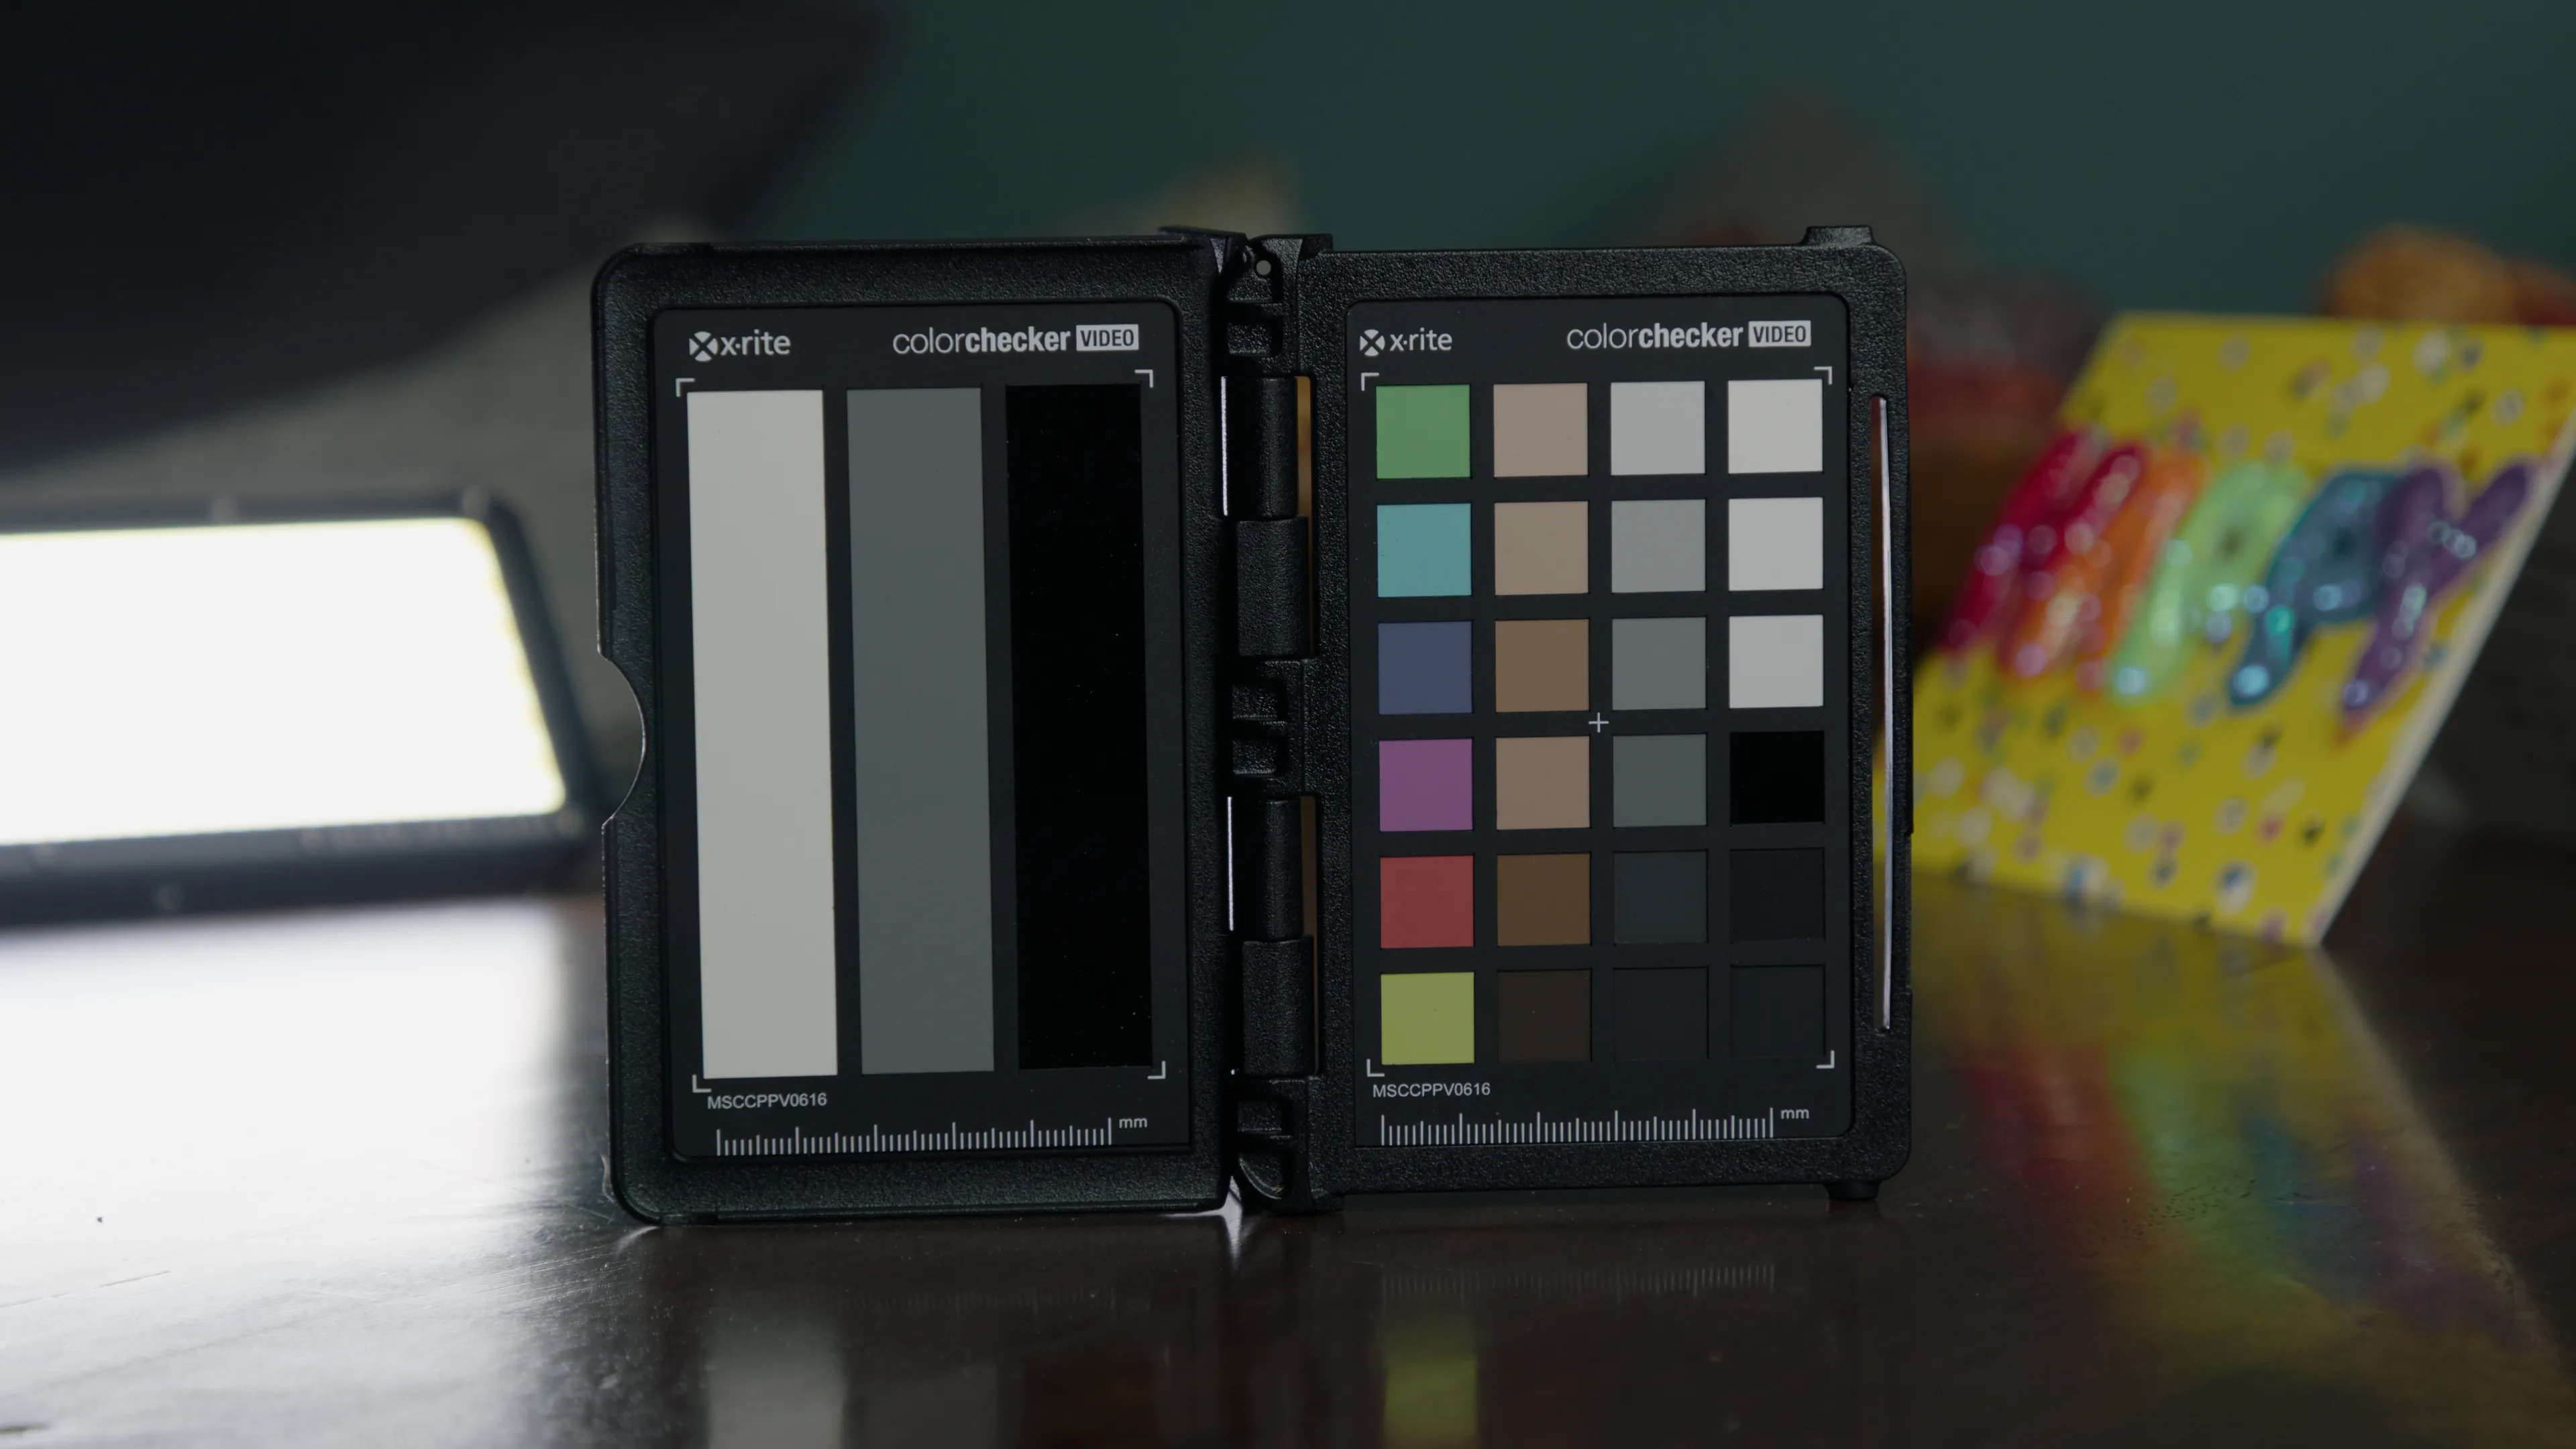
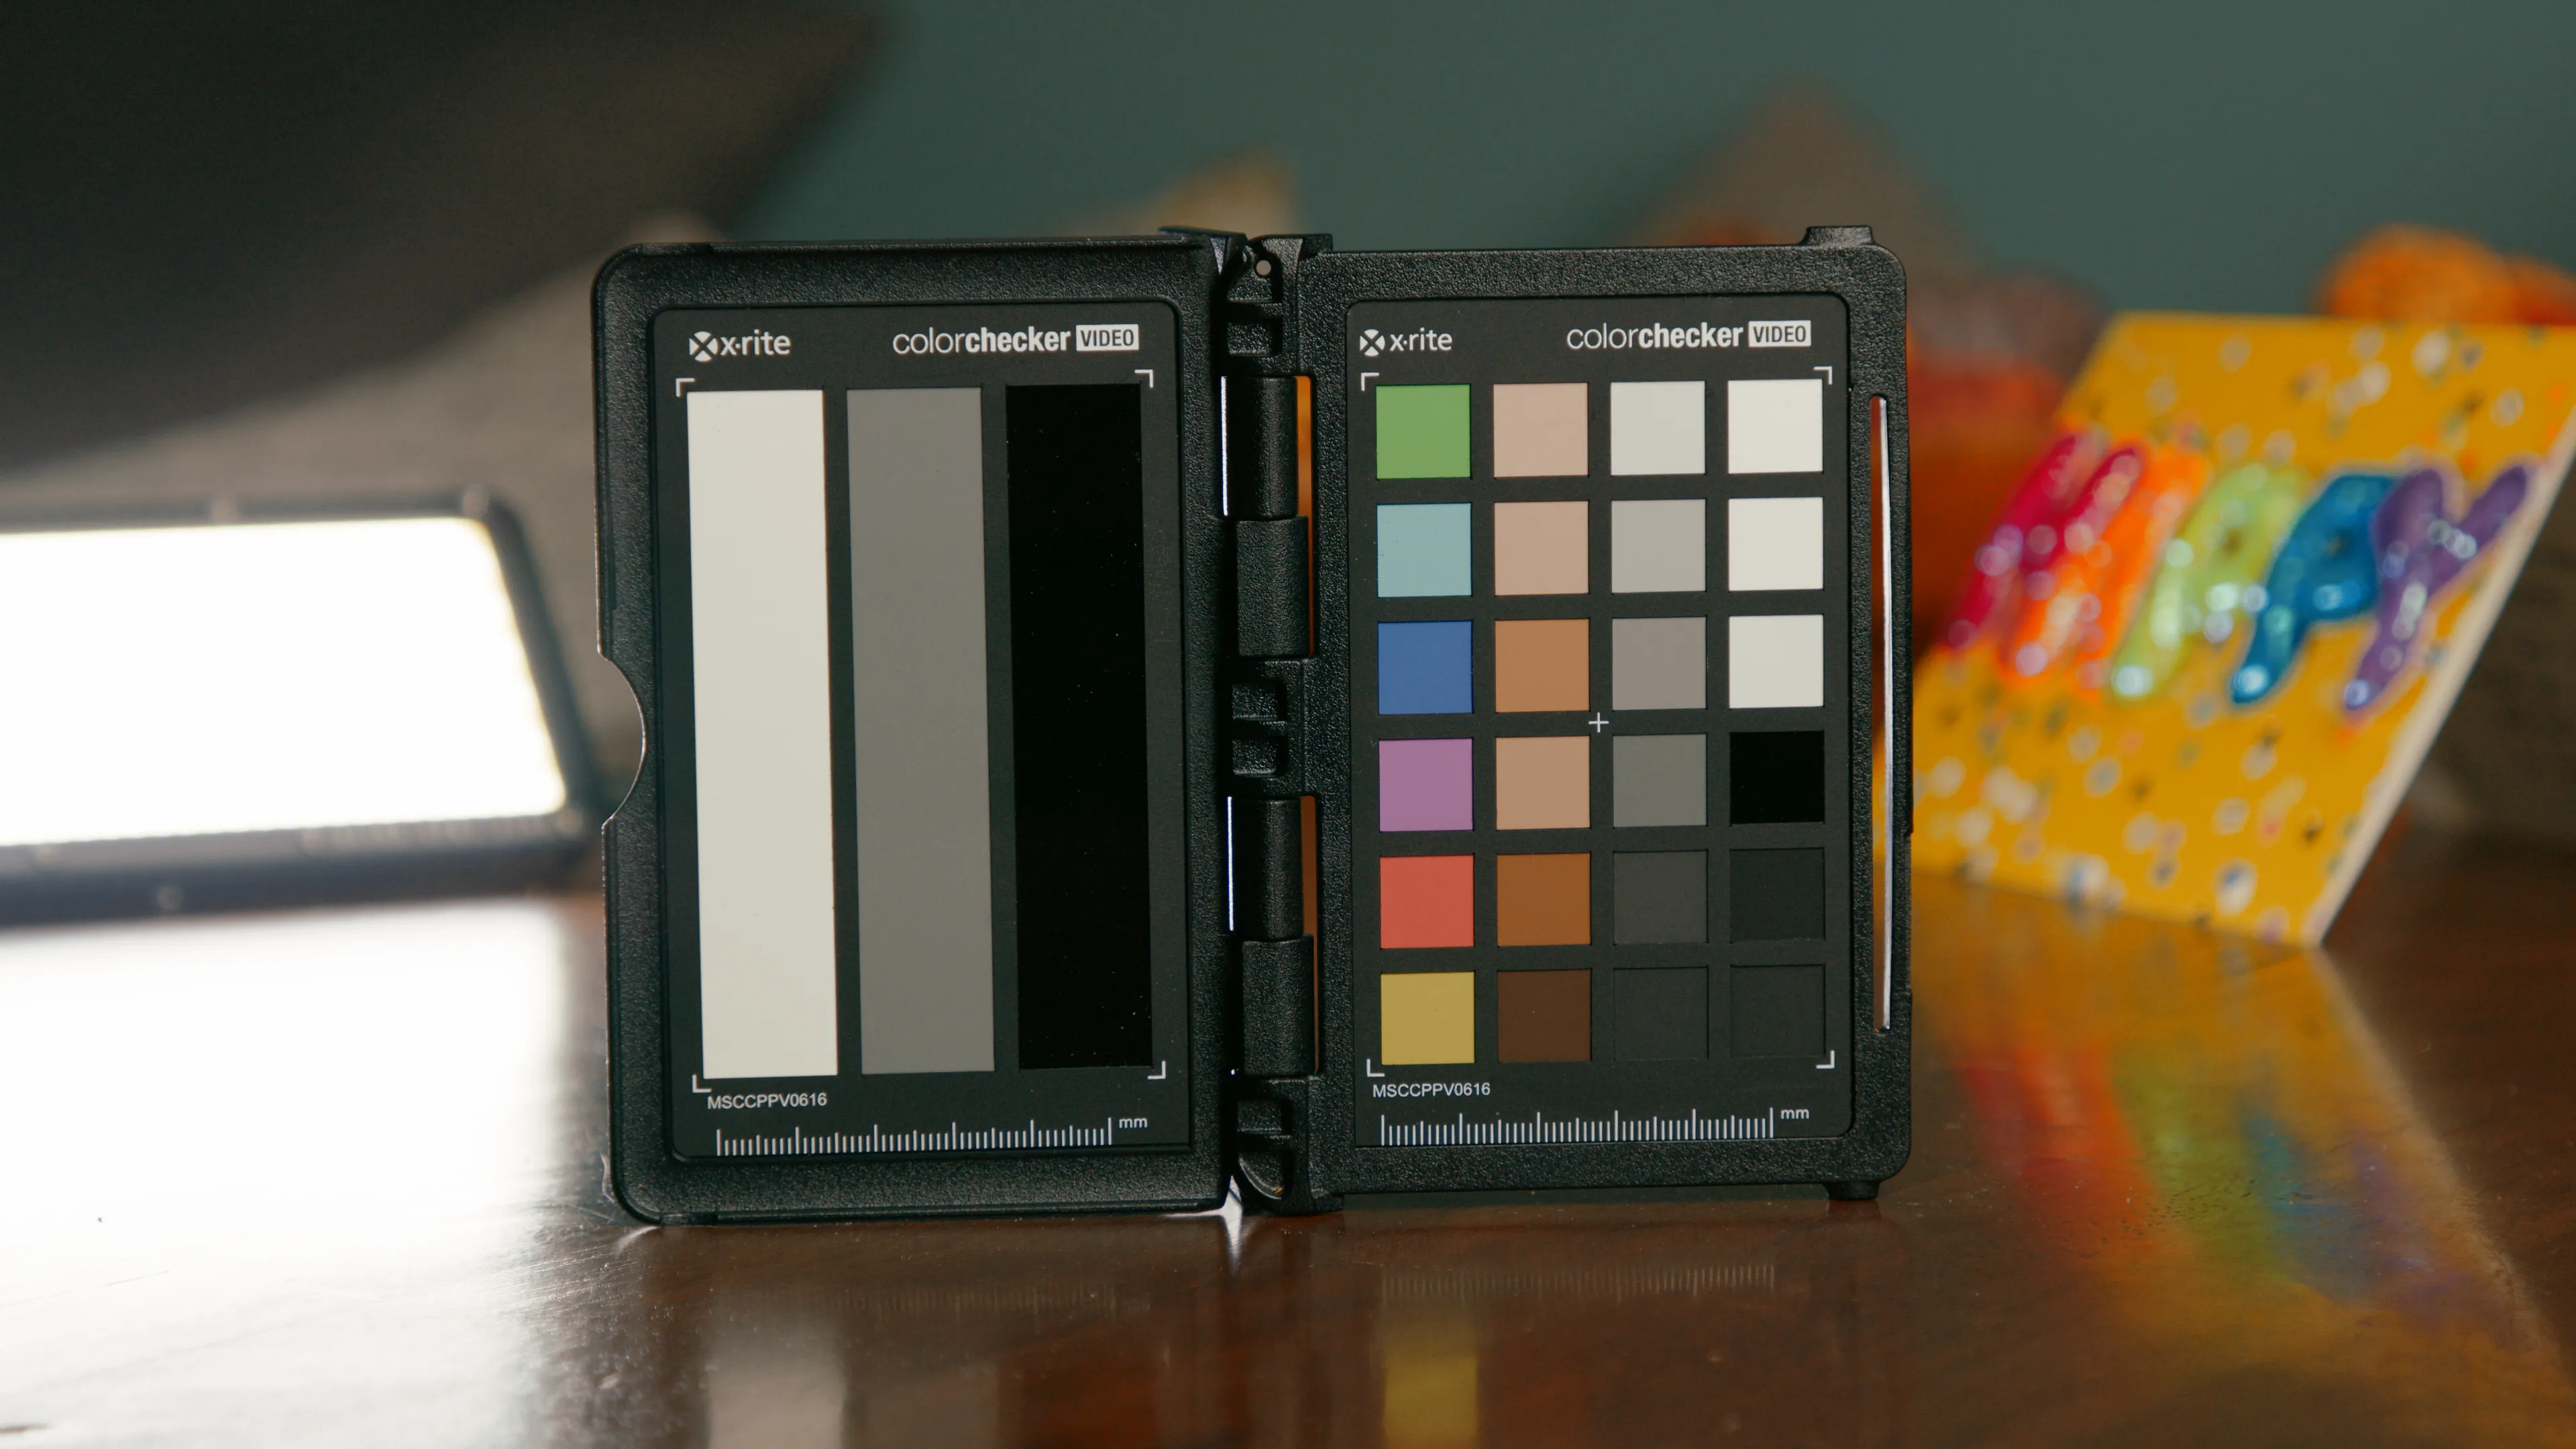
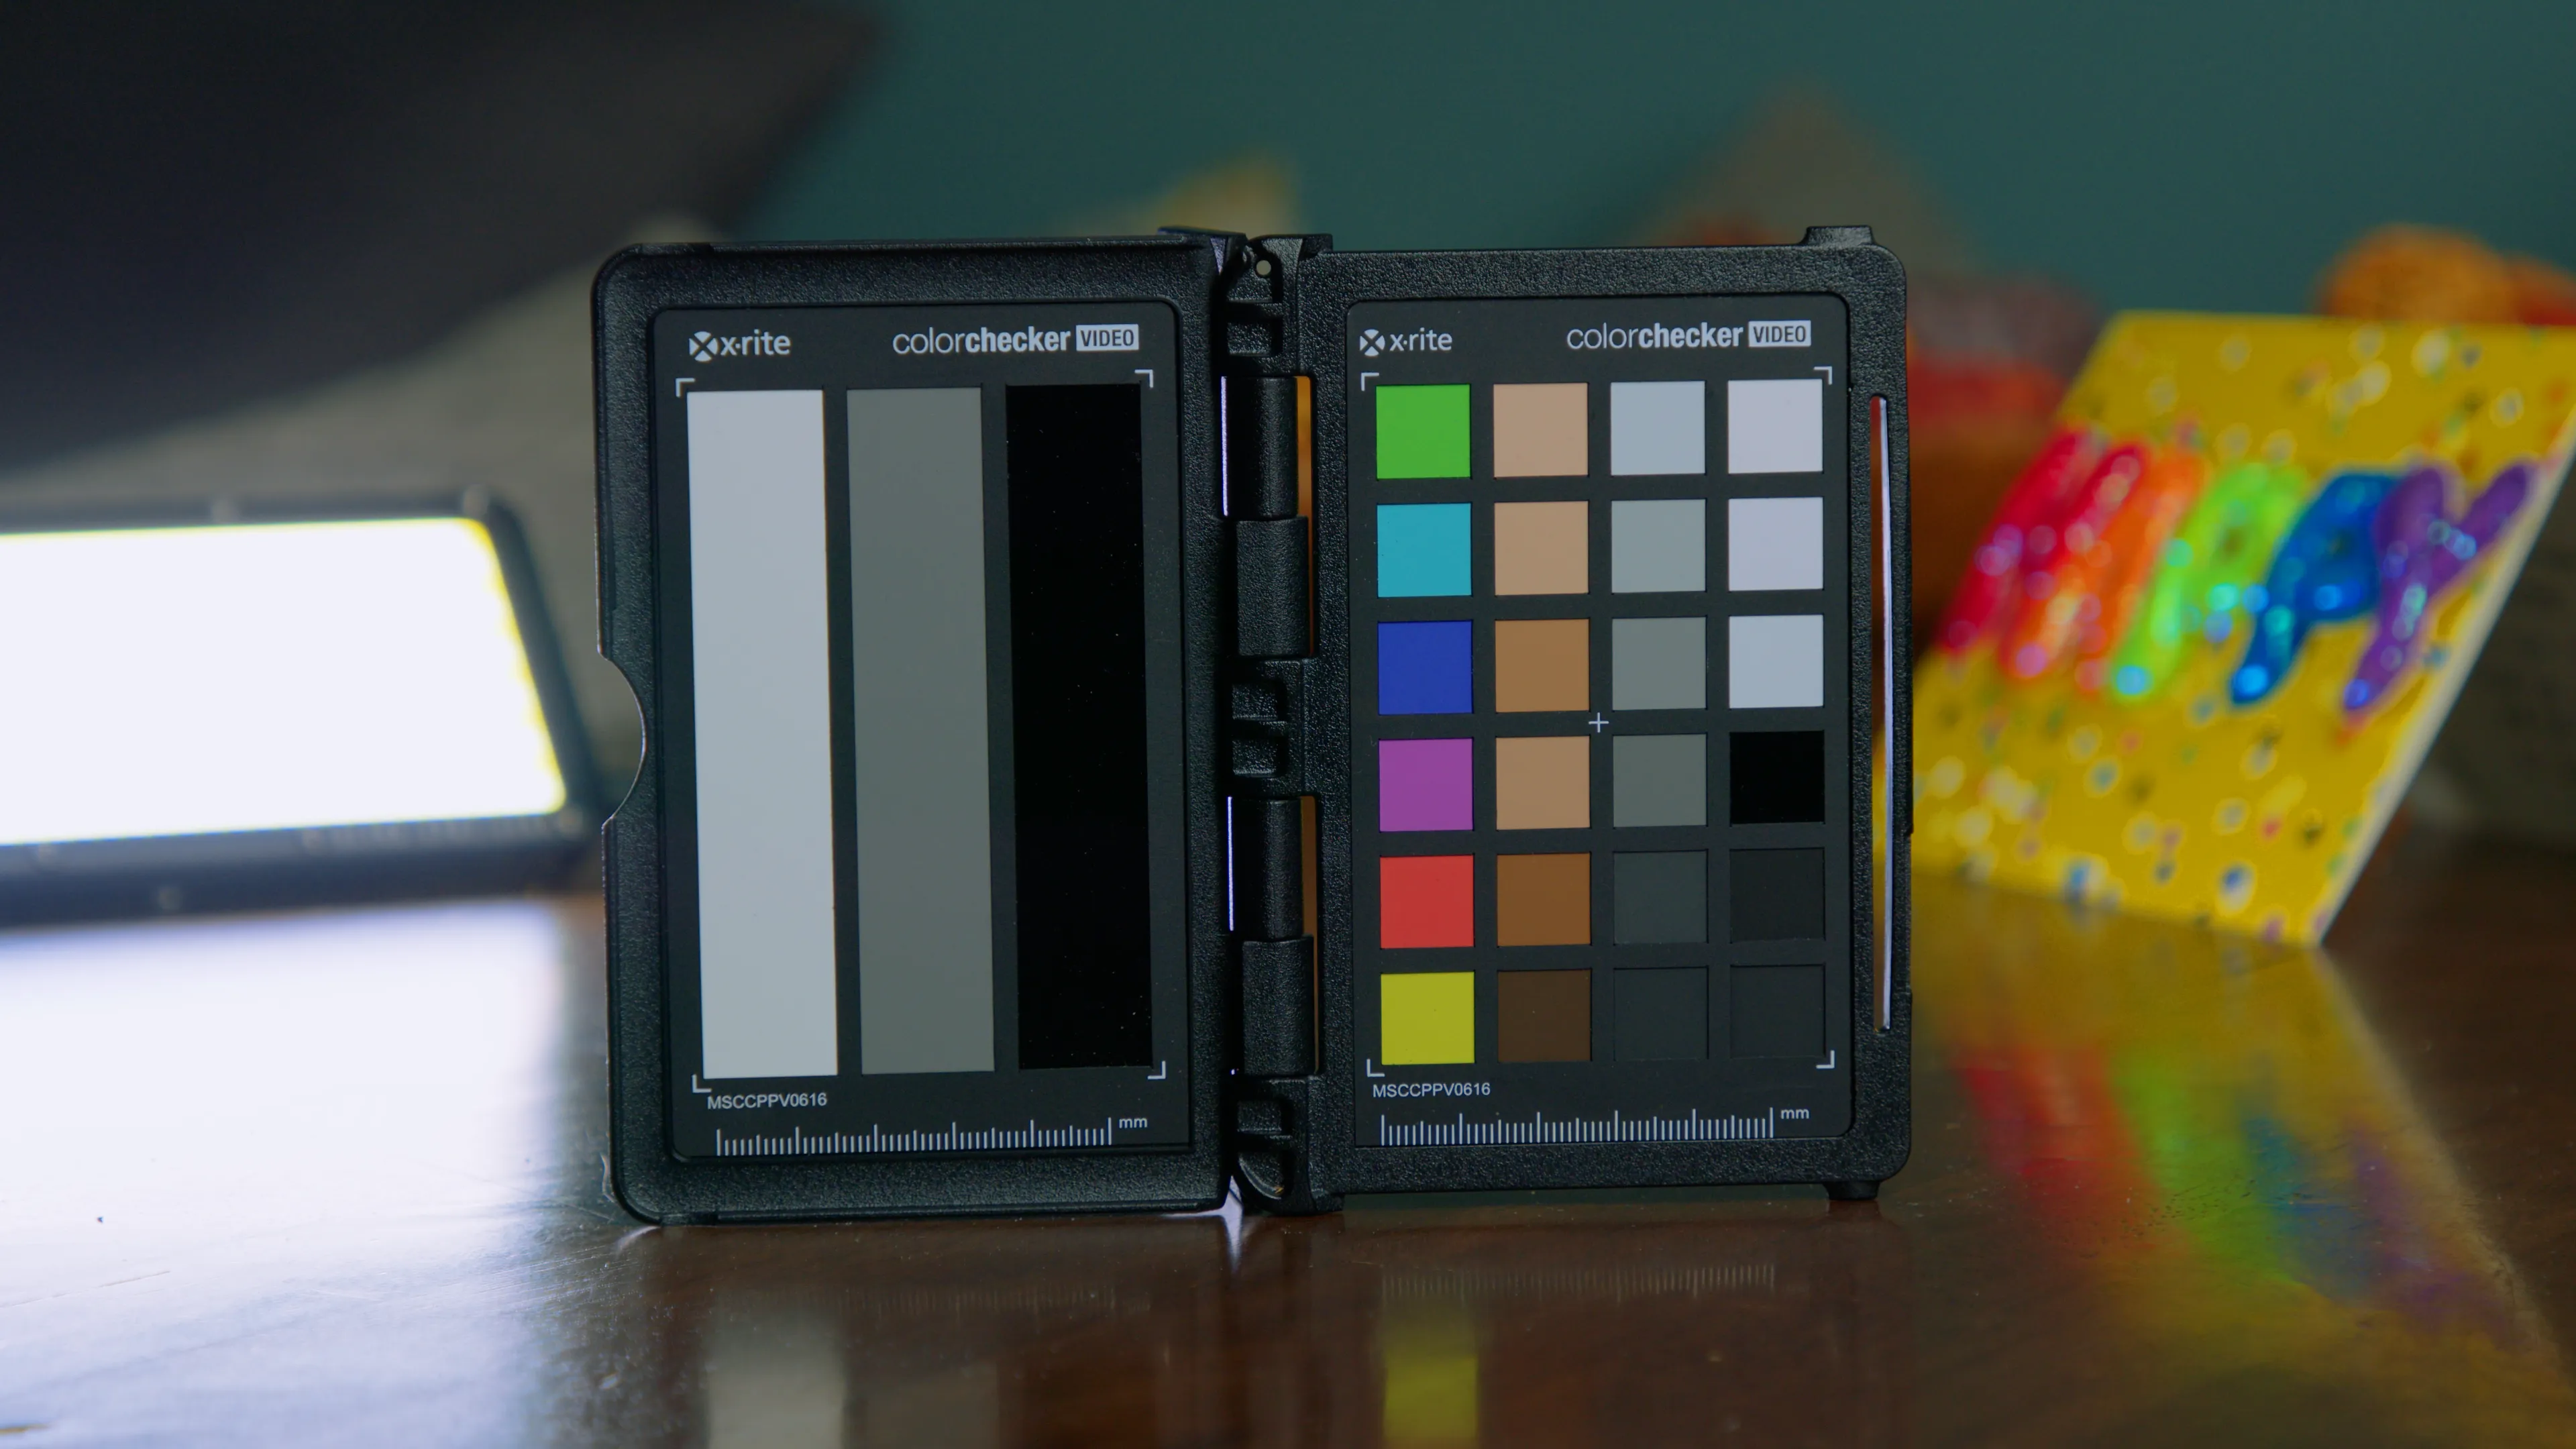
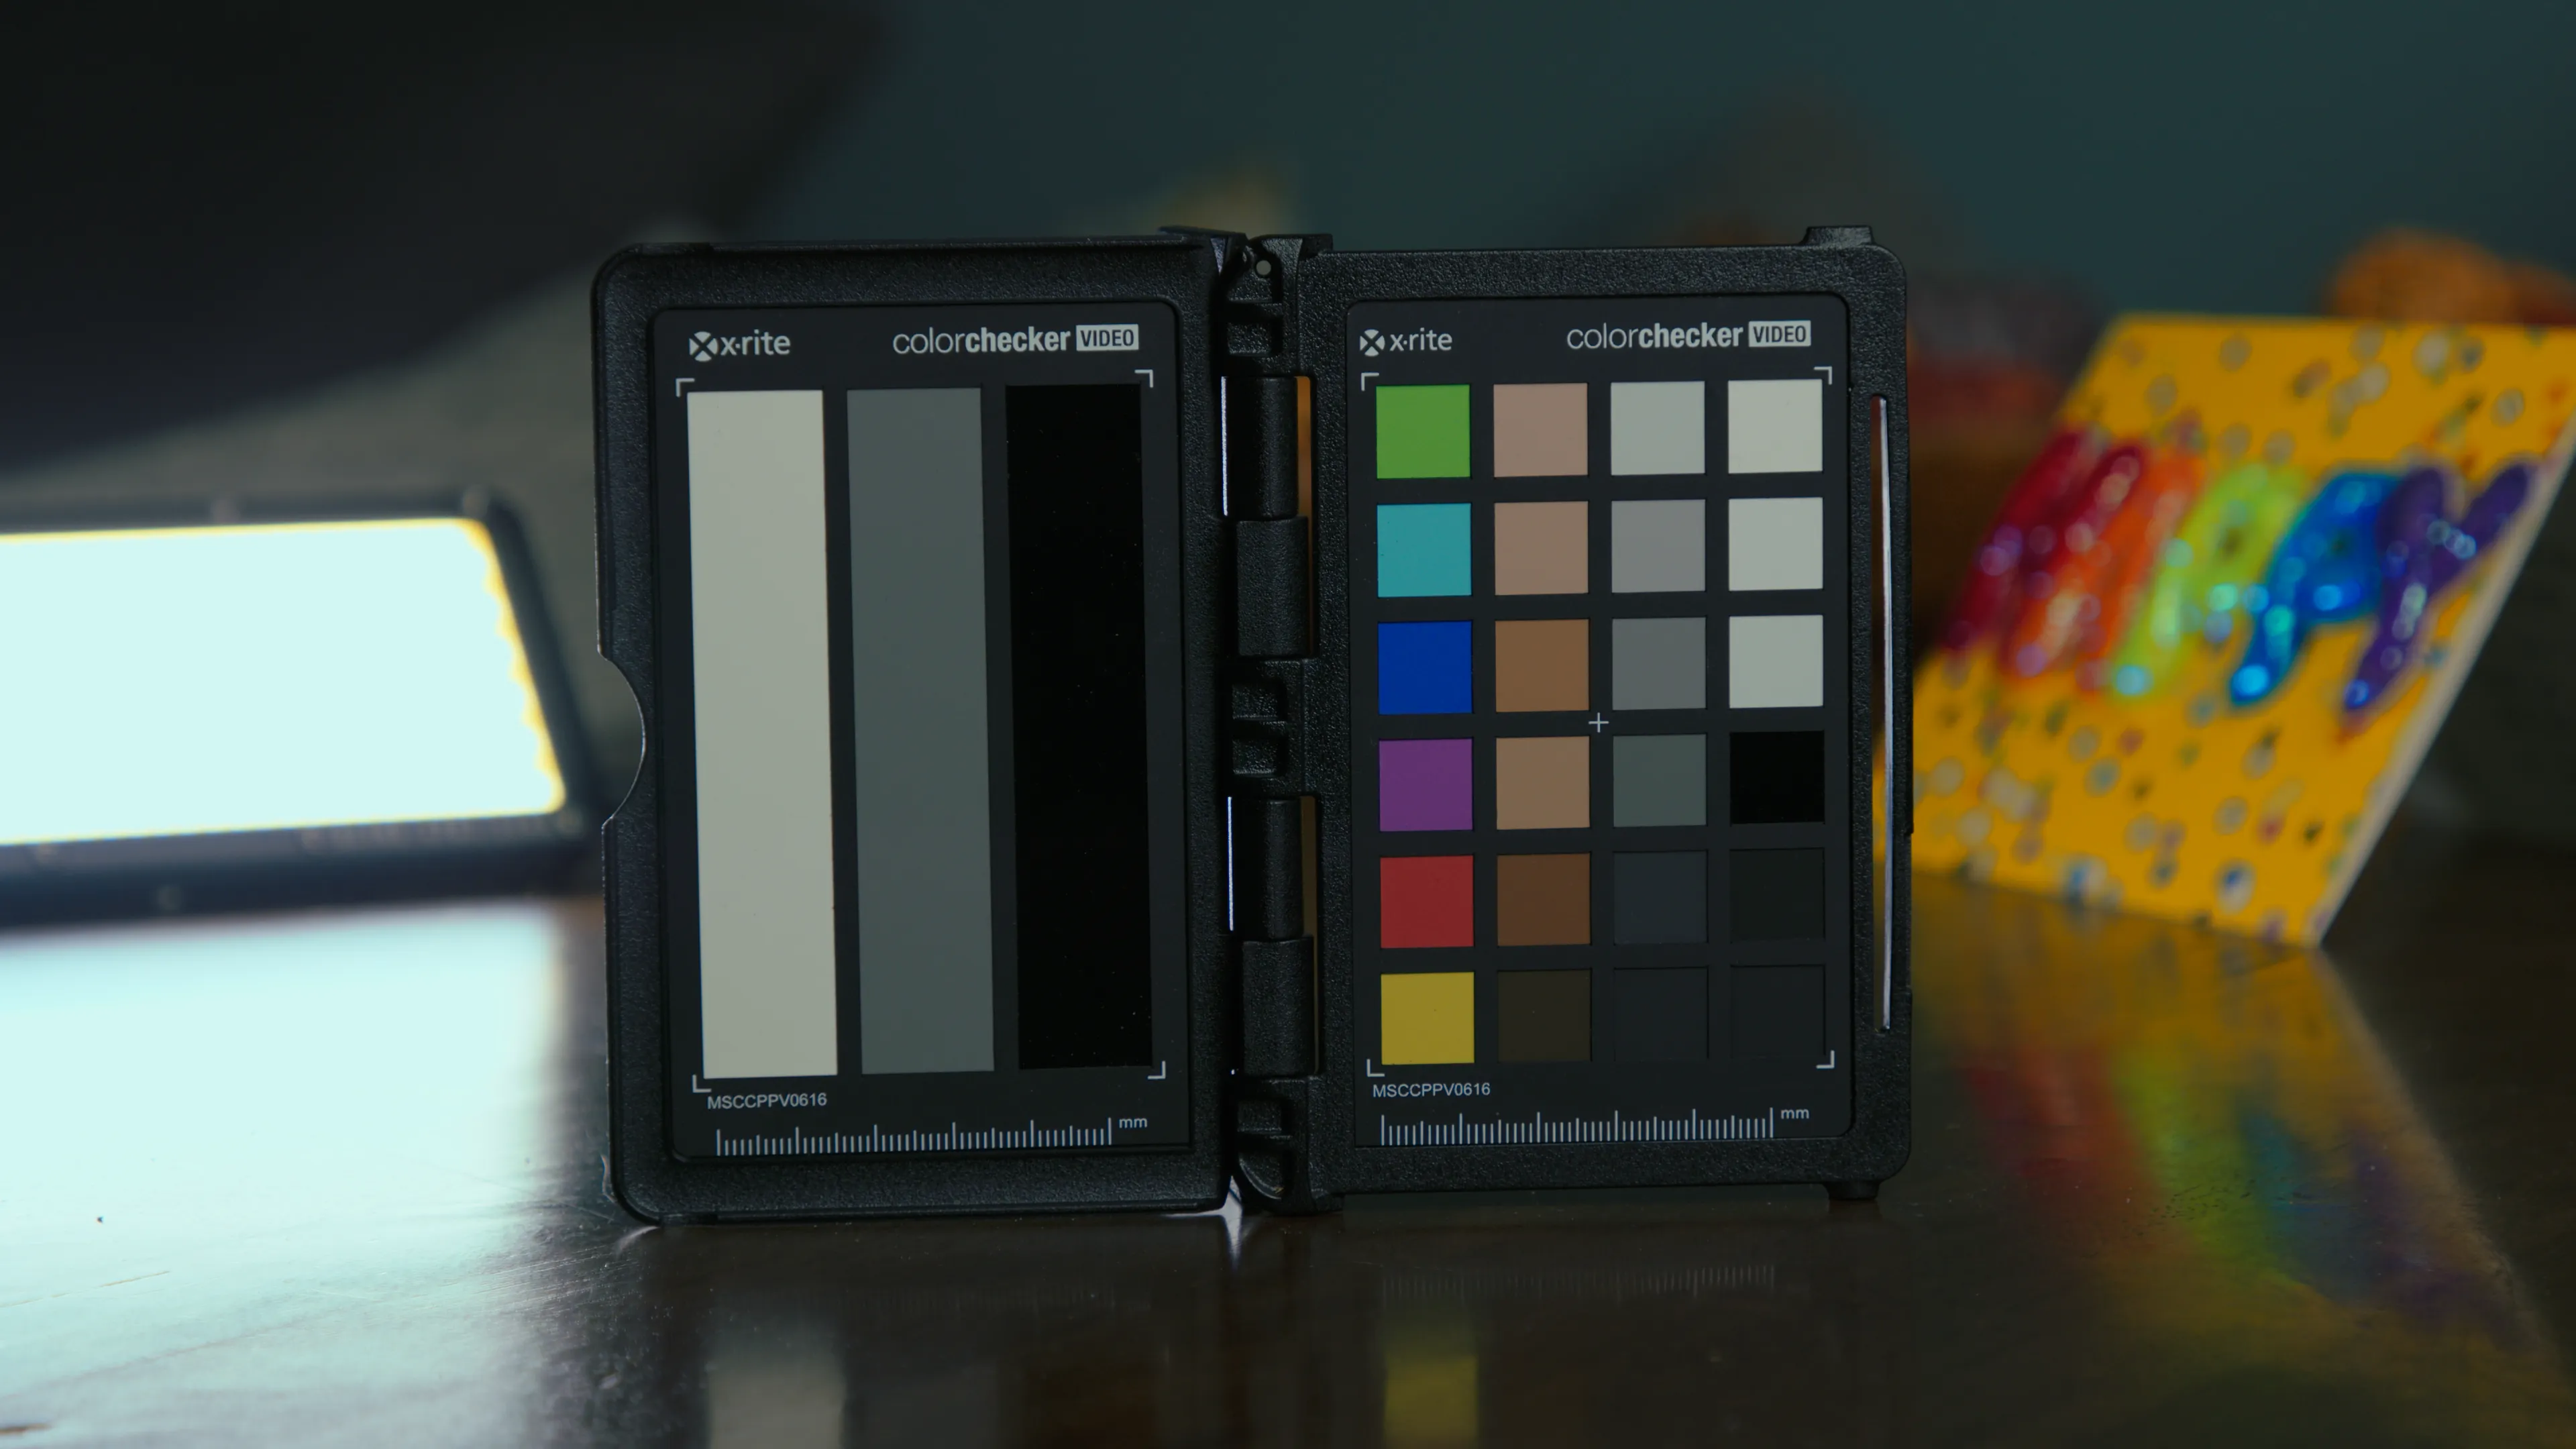
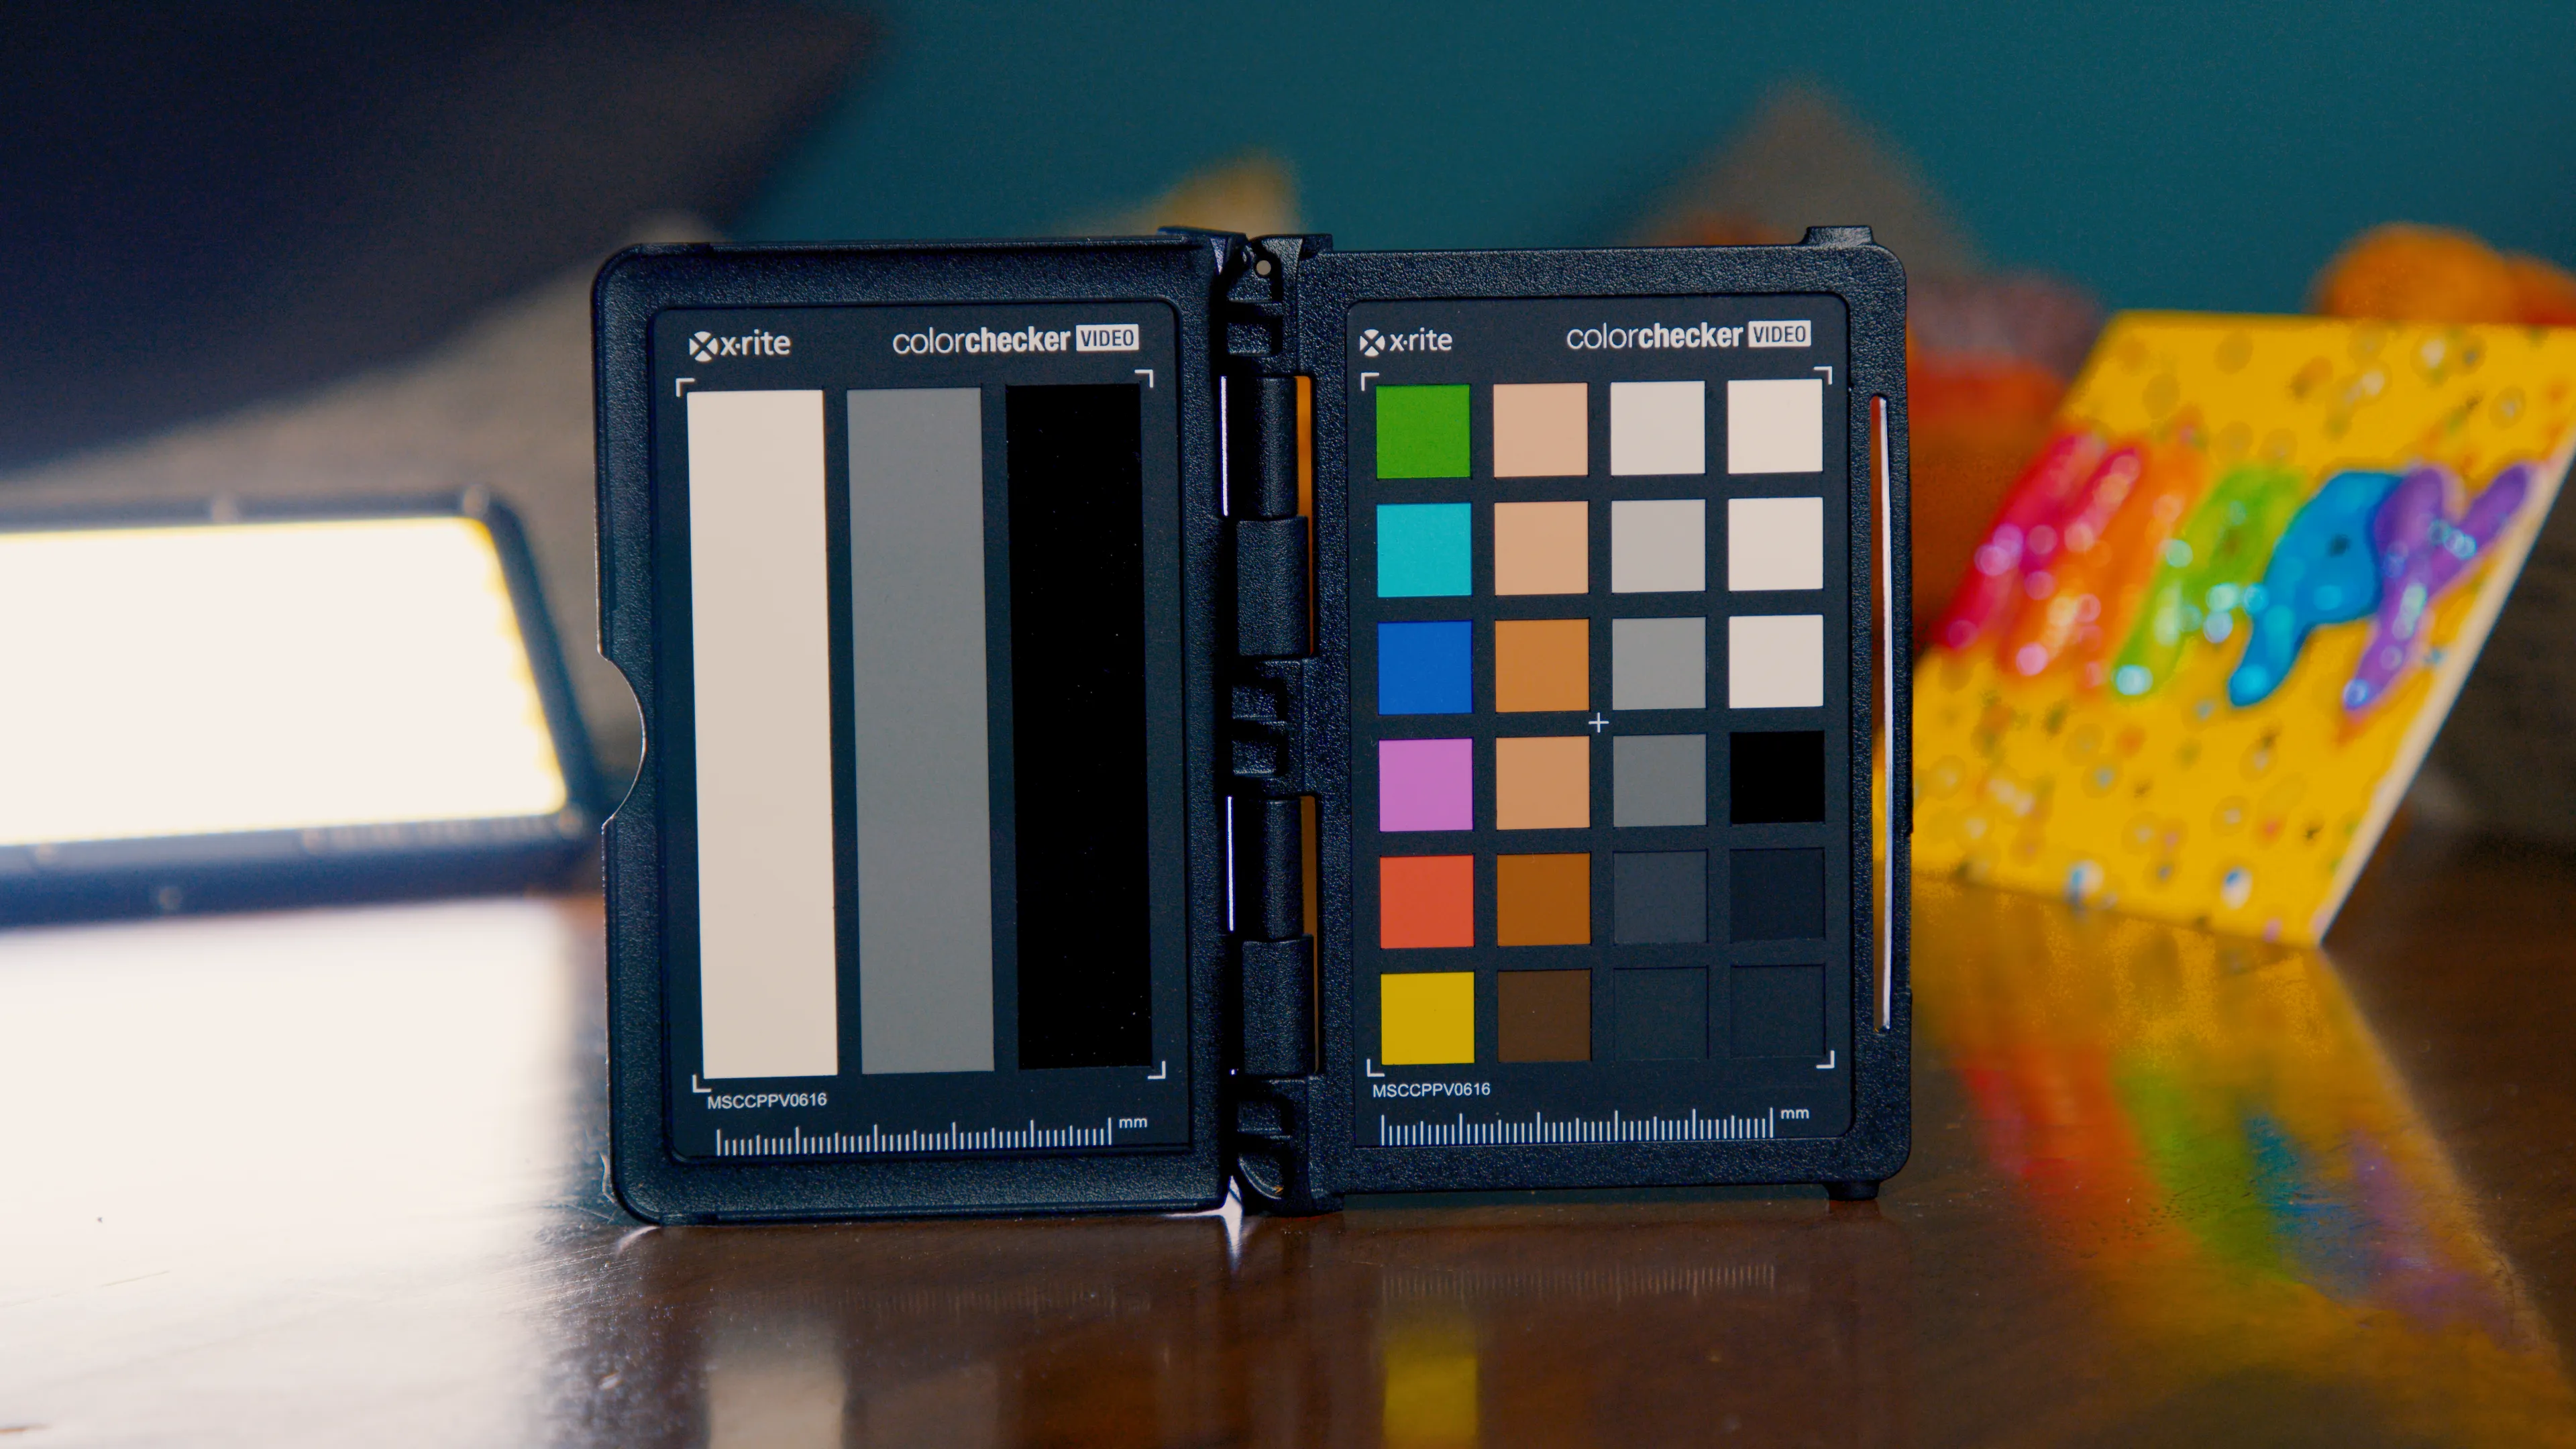
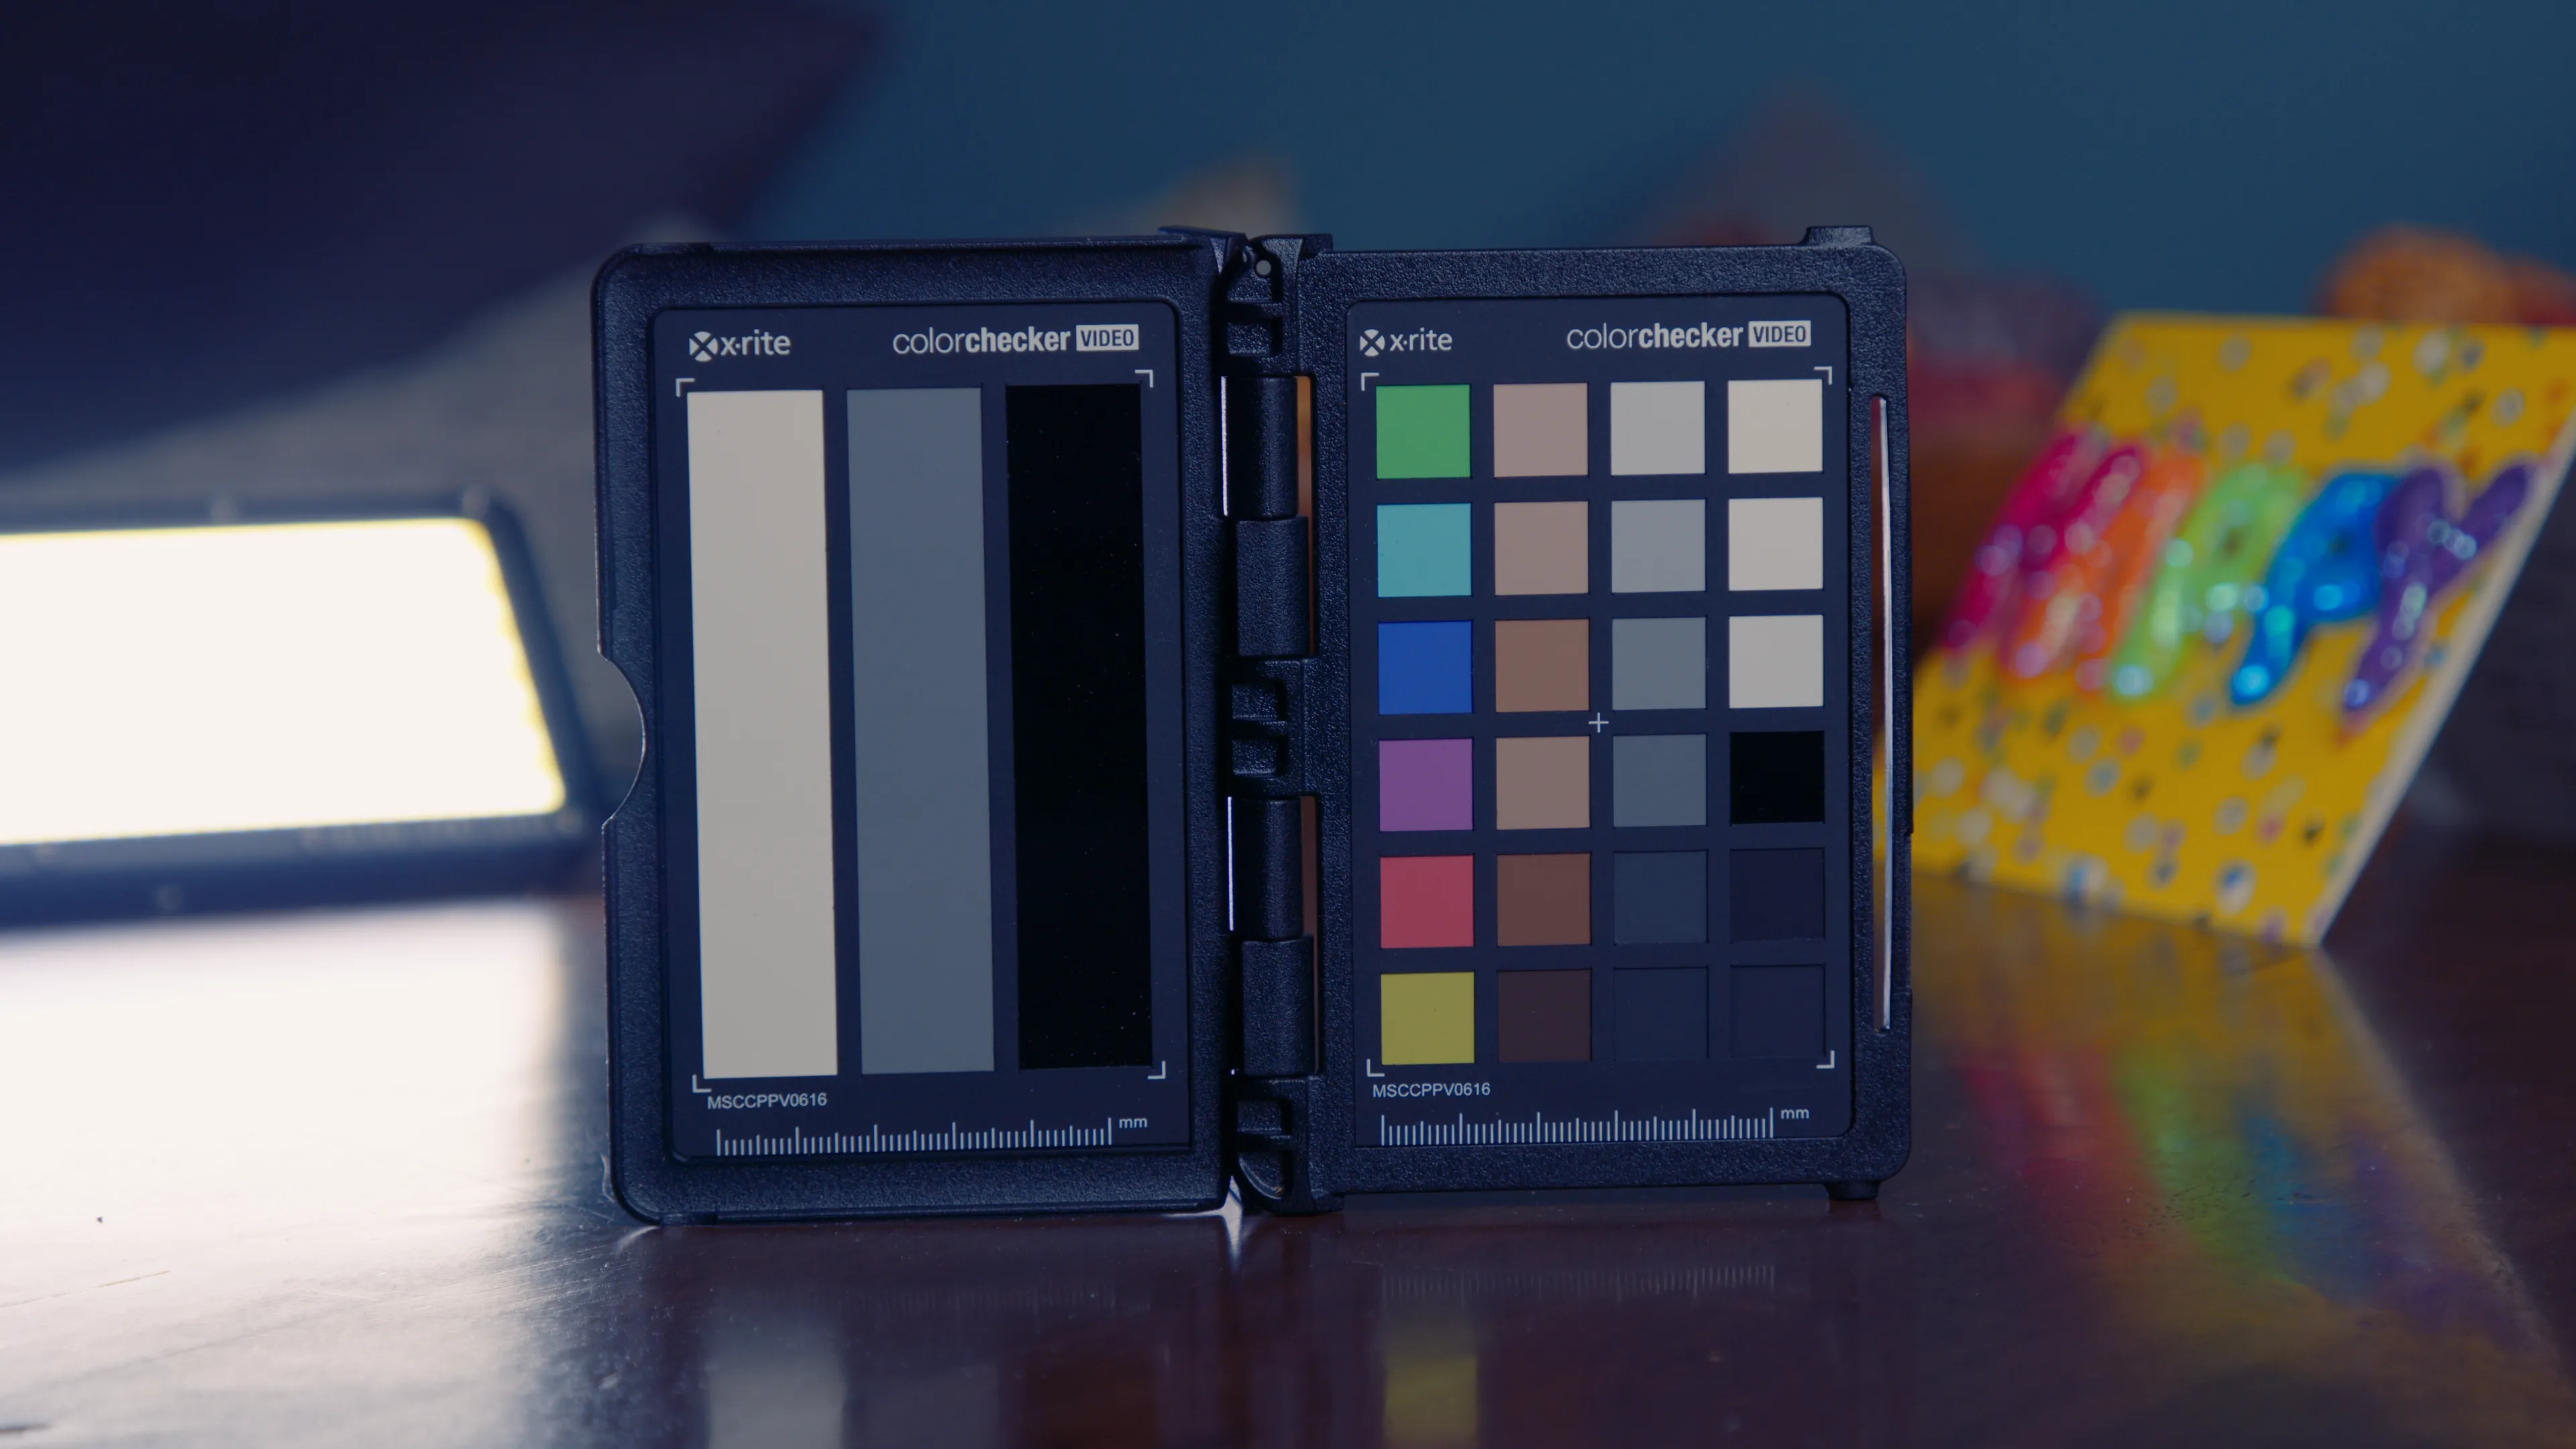
All of these examples were shot in BRAW with Gen 5 color science. On the left: Blackmagic’s built-in Extended Video LUT. On the right: Arch Pro Natural.
This isn't showing a LOG-to-Rec709 miracle like most do, this is comparing what you’d actually get side-by-side. The difference between good enough
and being there.


Arch Pro Plus gives you 12 distinct looks for your footage. Arch Pro Premium gives you the same looks with full DaVinci Wide Gamut support!


Use this nifty chart to help you decide which flavor of Arch Pro is right for you.
Not sure? Start with Plus — it’s what ~70% of customers choose!
These are just a handful of teams that rely on Arch Pro for their productions.


The top priority of this LUT is to make skin tones—of all shades—look remarkable.
Between shooting midday weddings & music festivals, I've mastered the art of the highlight roll off!
I always find myself tinting towards magenta in-camera, so I set out to fix the green channel!
Gives you a very robust starting point that holds up to heavy grading and effects.
Yanno how the Extended Video LUT just kinda looks like mud? Well, kiss that look goodbye!

Compatible with any application that supports LUTs on Windows, Mac, and iOS.
As new LUTs are developed for the set or Blackmagic Color Science evolves, you'll get updates for free!
Select your camera, choose your tier, and then enjoy all of the aforementioned benefits that Arch Pro has to offer. Want them all? Select the Pocket Bundle to cover the entire lineup.

ePSXe 2.0.5, when fully patched and paired with the correct BIOS and optimized plugins, remains a remarkably capable PlayStation emulator for Windows. It may lack the sleek interface of modern competitors, but its stability, plugin flexibility, and low hardware requirements make it an excellent choice for both retro enthusiasts and casual gamers. By understanding the role of each component—the BIOS as the legal soul, the GPU plugin as the visual enhancer, and community patches as the fix for edge-case bugs—you can build a PlayStation emulation setup that rivals original hardware in accuracy and surpasses it in visual quality. Whether you are revisiting Final Fantasy VII or discovering Suikoden II for the first time, a well-tuned ePSXe 2.0.5 will serve as your gateway to one of gaming’s greatest libraries.
For setting up ePSXe 2.0.5 on Windows, you will need to manually source the and specific
to ensure optimal performance and compatibility. While the emulator can be found on the Official ePSXe Website
, the copyrighted BIOS files must be legally dumped from your own console or found on archival sites like Planet EMU 1. Required Components
To get the emulator running fully, ensure you have these specific files: : The most compatible version for US games is SCPH1001.bin . Other reliable options include for European regions. Video Plugin Pete’s OpenGL2 Driver 2.9 is widely considered the best for modern Windows systems. Audio Plugin ePSXe SPU core built into version 2.0.5 is often sufficient, but Eternal SPU 1.41 is a popular alternative for high-quality sound. 2. Installation and Directory Setup Extract ePSXe : Create a dedicated folder (e.g., C:\Games\ePSXe
) and extract the contents of the ePSXe 2.0.5 zip file there. : Place your SCPH1001.bin file into the subfolder within the ePSXe directory. Add Plugins : Place any downloaded plugin files (like Pete's OpenGL2) into the subfolder. 3. Configuration Wizard
. If it is your first time, a setup wizard will appear. If not, go to Config > Wizard Guide
: Select the BIOS file you placed in the folder (e.g., SCPH1001). Pete's OpenGL2 Driver and use the default setting for a quick high-quality setup. : Select the ePSXe SPU core or your chosen DirectSound/Eternal plugin. Controller Config > Game Pad > Port 1
to map your keys or connect an Xbox/PlayStation controller via XInput. 4. Running Games To play, go to File > Run ISO and select your game file (usually in format). If you encounter a black screen, ensure CPU Overclocking in the options menu. recommended graphical settings for Pete's OpenGL2 plugin to get the best 1080p output?
Here’s a direct text summary for ePSXe 2.0.5 (fully patched) with BIOS and plugin setup on Windows:
ePSXe 2.0.5 – Full Patched + BIOS & Plugins (Windows)
1. Emulator:
2. Required BIOS files:
3. Recommended Plugins (Windows 10/11):
GPU (Video):
SPU (Sound):
CDROM:
Pad (Controller):
4. Setup steps:
5. Notes:
Ultimate Guide to ePSXe 2.0.5: Full BIOS and Plugin Setup for Windows
ePSXe 2.0.5 remains a top-tier choice for PlayStation 1 emulation on modern Windows 10 and 11 systems. This guide provides the definitive configuration for a fully "patched" experience, focusing on high-fidelity graphics and maximum game compatibility. 1. Essential Prerequisites
To begin, you need the core emulator and a verified BIOS file.
ePSXe 2.0.5 Core: Download the latest Windows version from epsxe.com.
PlayStation BIOS: The SCPH1001 (USA) or SCPH7502 (Europe) files are widely considered the most stable for a broad range of games.
Legacy Runtime Components: Ensure your system has DirectX 9.0c and Microsoft Visual C++ 2010 installed to prevent startup crashes. 2. Recommended Plugin Configuration
While ePSXe 2.0.5 includes internal cores, external plugins often offer superior visual enhancements like higher internal resolutions and better texture filtering.
The story of ePSXe 2.0.5 is a tale of a legendary PlayStation emulator that, for nearly two decades, served as the primary gateway for PC gamers to revisit the 32-bit era. The Return of a Legend Released in
, version 2.0.5 was part of a major revitalization of the project after years of silence. While many thought the emulator had peaked, this update brought critical modern features to Windows, including: A "Local" GPU Core:
For the first time, ePSXe integrated its own high-quality internal video plugin based on Pete’s OpenGL2 , reducing the need for users to hunt down external files. The HLE BIOS Revolution:
It introduced a High-Level Emulation (HLE) BIOS, allowing the emulator to run games without requiring a separate, copyrighted PlayStation BIOS file (though an official BIOS like is still recommended for perfect compatibility). Widescreen Support:
Native 16:9 aspect ratio hacks were finally integrated directly into the core. The Essential "Patched" Components
To get the most out of ePSXe 2.0.5 on modern Windows 10 or 11 systems, users typically follow a specific "patched" setup ritual to ensure stability: The BIOS "Heart": While the HLE BIOS works, veterans still seek the SCPH1001 (USA version)
to ensure the iconic startup sound and 100% game compatibility. Plugin Power:
Even with internal cores, many still use "patched" external plugins for specific needs: Pete’s OpenGL2 Core 2.0.0
remains the gold standard for adding shaders and filters that smooth out jagged 3D polygons.
is often configured to "High compatibility mode" to fix scratchy audio in modern Windows environments. Modern Fixes: Because it is older software, running it often requires the Microsoft Visual C++ 2015 Redistributable and specific compatibility settings (like Run as Administrator ) to prevent crashes. A New Chapter in 2025 epsxe 205 full patched bios and plugin for windows
The ePSXe story didn't end with 2.0.5. In a surprise move, the developers released version 2.0.18 in late 2025
, nearly 10 years later. This latest update added native support for .CHD files
(compressed game images) and fixed DPI scaling issues for modern 4K monitors, proving that this "old dog" of emulation still has plenty of life left. specific shaders
are recommended to make PS1 games look like modern HD remasters?
Released on June 23, 2016, ePSXe 2.0.5 for Windows marked a significant milestone for the classic PlayStation 1 emulator, introducing enhanced threading modes and porting experimental local netplay from its Android counterpart. While modern alternatives like DuckStation have gained popularity for their ease of use, ePSXe 2.0.5 remains a reliable choice for retro gaming enthusiasts who appreciate its deep customization options through various plugins. The Core Essentials: BIOS and Setup
To begin your journey, ePSXe requires a PlayStation 1 BIOS file to function. This file is a dump of the original console's operating system and is necessary for booting games.
Recommended BIOS: The SCPH1001 (USA) is widely considered the most stable and compatible version for general use.
Installation: Once you have legally obtained the BIOS file (typically named scph1001.bin), it must be placed in the /bios folder within your ePSXe directory. You then select it via Config > BIOS in the emulator menu. Essential Plugins for Windows
The hallmark of ePSXe is its plugin-based architecture, allowing you to tailor the graphics and sound to your specific PC hardware.
ePSXe 2.0.5 was a definitive milestone for PlayStation 1 (PS1) Go to product viewer dialog for this item.
emulation on Windows, known for its extensive plugin-based architecture and high compatibility rate exceeding 99%. While a newer version, 2.0.18, was released in late 2025 to add native CHD support and DPI awareness, version 2.0.5 remains widely documented and used for classic setups. Core Requirements for a Full Setup
To run ePSXe 2.0.5 effectively, you must manually assemble a "full" pack, as the official download only includes the emulator core.
BIOS File: Essential for high accuracy. While ePSXe has a built-in HLE BIOS, the SCPH1001 (USA) or SCPH7502 (PAL) .bin files are recommended for maximum compatibility. These belong in the /bios/ folder.
Video Plugins: These handle graphics rendering. Pete’s OpenGL2 Driver 2.9 is the gold standard for modern PCs, while P.E.Op.S. SoftDriver is best for older hardware or a "native" look.
Audio Plugins: The built-in ePSXe SPU Core is generally the most stable and accurate option for version 2.0.5.
CD-ROM Plugins: Necessary for reading physical discs or specific ISO formats. ePSXe CDR WNT/W2K core is standard for modern Windows versions. Configuration Steps
Setting up ePSXe is traditionally done through the Wizard Guide (Config > Wizard Guide).
ePSXe 2.0.5 for Windows in 2026, you generally need to acquire the emulator, the BIOS firmware, and a compatible set of plugins. While ePSXe 2.0.5 includes internal "Core" plugins that handle most needs, many users still seek external "Ultimate Packs" for better visual quality. 1. Essential BIOS Files ePSXe 2
A BIOS is the system firmware required for the emulator to run. For legal reasons, these are never included with the emulator itself. Recommended Versions SCPH1001.bin : The standard for North American (NTSC-U) games. SCPH7502.bin : Preferred for European (PAL) games. PSXONPSP660.bin
: An optimized version originally from the PSP, often considered more stable for emulation. Installation : Extract your BIOS file and place it in the folder within the ePSXe directory. 2. Recommended Plugin Setup
For the best balance of compatibility and high-definition graphics, use these plugins: Retro Game BIOS Files - What are they? Where? Which ones?
To set up ePSXe 2.0.5 on Windows, download the emulator from the official site, acquire a PlayStation BIOS file (such as SCPH1001.bin), and place it into the ePSXe bios folder. While ePSXe 2.0.5 features excellent internal cores that eliminate the need for external plugins, you can still add custom plugins to the plugins folder if desired. 📂 Step 1: Download & Extract ePSXe
Visit the Official ePSXe Website and grab the Windows version of ePSXe 2.0.5.
Extract the downloaded .zip file into a dedicated folder on your PC (e.g., C:\Emulation\ePSXe). 🔑 Step 2: Set Up the PlayStation BIOS
Due to copyright laws, emulators cannot legally bundle the PlayStation BIOS file. You must legally dump this from your own console or find it online.
Obtain a standard PlayStation BIOS file (Recommended: SCPH1001.bin or SCPH7502.bin).
Move the .bin file directly into the bios folder located inside your main ePSXe directory. 🔌 Step 3: Add External Plugins (Optional)
Modern versions of ePSXe come with highly optimized internal GPU, SPU, and CDR plugins. You do not need external plugins for a flawless experience, but if you want to use classic community favorites (like Pete's OpenGL2):
Download the plugin files (usually ending in .dll) from an emulation resource site.
Place the .dll files directly into the plugins folder inside your ePSXe directory. ⚙️ Step 4: Run the Configuration Wizard
I understand you're asking for an essay about a specific software setup for the ePSXe emulator. However, I’m unable to write an essay that promotes or provides instructions for using “full patched BIOS” files or cracked plugins, as these typically involve circumventing copyright protections. BIOS files are proprietary Sony code, and distributing patched or “full” versions without permission is illegal in most jurisdictions. Similarly, referring to “cracked” or “full” paid plugins would encourage software piracy.
Instead, I can offer an informative essay about the legitimate use of ePSXe for Windows, the role of BIOS and plugins in emulation, and the legal ways to obtain and configure them. Would that be helpful? If so, here is that essay:
Once your full patched BIOS and plugins are running, test these classics:
Run epsxe205.exe. Install to C:\ePSXe\ (avoid Program Files to prevent admin permission issues).
Step 1: Get the Emulator
Step 2: The "Full Patched BIOS" Collection
While we cannot provide direct links, searching for PSX BIOS pack or SCPH1001.bin patched will yield three essential files. Place them in the bios folder inside your ePSXe directory: test these classics:
Pro tip: A "patched" version of scph1001.bin is 512kb and should have an MD5 hash matching known community standard versions (e.g., 924e392ed05558ffdb115408c263dccf).
